Nested Workflows
As your business processes become more sophisticated, you may find that the same sequence of tasks is needed in multiple workflows. Rather than recreating those steps each time, ClayHR allows you to embed one workflow inside another.
This is known as a nested workflow.
Nested workflows improve consistency, reduce maintenance, and allow you to build reusable workflow components that can be shared across multiple business processes.
For a general introduction to workflows, phases, steps, assignments, and workflow design, see Getting Started: Workflows before continuing.
Why Use Nested Workflows?
Nested workflows are useful whenever a business process contains a standard sequence of activities that is reused in multiple places.
For example:
- A standard IT equipment provisioning process that is used by both onboarding and internal transfer workflows.
- A compliance review that must occur before several different HR processes can continue.
- A document signing process that is shared by hiring, promotions, and policy acknowledgements.
- A manager approval process that is required by multiple operational workflows.
Instead of maintaining several copies of the same steps, you maintain a single workflow and reference it wherever it is needed.
Benefits include:
- Easier maintenance
- Consistent execution across processes
- Reduced duplication
- Faster workflow design
- Reusable workflow building blocks
How Nested Workflows Work
Within the parent workflow, one of the workflow steps is configured as Completing a Workflow.
When execution reaches that step:
- the selected child workflow is launched,
- it is assigned to the designated user,
- users can access it independently or from within the parent workflow,
- once the nested workflow is completed, the parent workflow continues with its remaining steps.
This allows complex business processes to be broken into smaller, reusable workflow modules while still providing a seamless experience for users.
How to Add a Nested Workflow
1. Open the Workflow Designer
Navigate to:
Gear → Forms, Workflows & Templates → Workflows
Open an existing workflow or create a new one.
2. Add a New Step
Within the workflow designer, create a new step where you want the secondary workflow to begin.
3. Select the Workflow Step Type
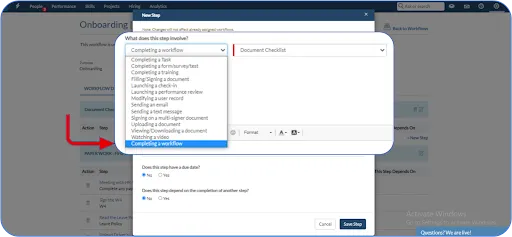
For the step type, choose:
Completing a Workflow
A list of available workflows will appear.
Select the workflow you want to include.
Image
4. Choose Who Will Complete the Nested Workflow
Specify who should receive the nested workflow assignment.
You can assign it to:
- the assignee of the parent workflow,
- a specific user,
- the workflow coordinator of the parent workflow.
This allows responsibility for the nested workflow to be independent from the parent workflow when required.
Image
5. Configure the Step
Optionally configure:
- Step title
- Description
- Due date
- Step dependencies
These settings work exactly like any other workflow step.
Save the step when finished.
6. Complete the Parent Workflow
Continue adding any remaining phases and steps required in the parent workflow.
Save and publish the workflow.
Using the Nested Workflow
After the parent workflow is assigned:
- both the parent workflow and the nested workflow appear in the user's workflow list,
- users can open the nested workflow directly,
- or launch it from within the parent workflow.
Selecting Go to Workflow opens the nested workflow in a separate browser tab, allowing users to complete it independently while maintaining its connection to the parent workflow.
Nested Workflows Best Practices
Nested workflows work best when they represent a reusable business process rather than a one-time sequence of tasks.
Good candidates include:
- Standard approval processes
- Equipment provisioning
- Security or compliance reviews
- Document collection
- Orientation checklists
- Department-specific onboarding activities
If a sequence of tasks is likely to be reused across multiple workflows, creating it as a standalone workflow and nesting it where needed makes future maintenance significantly easier.
Related Articles
- Getting Started: Workflows
- How to Create a Workflow in ClayHR
- Assign a Workflow to a User or Candidate
- How to Add a Conditional Phase in a Workflow
- How to Use Parameters in Workflows
-----------
Workflow as a Step in Main Workflow
1. Go to the gear icon and select Forms, Workflows & Templates.

2. Select the Workflows section from the left panel and open Workflows.
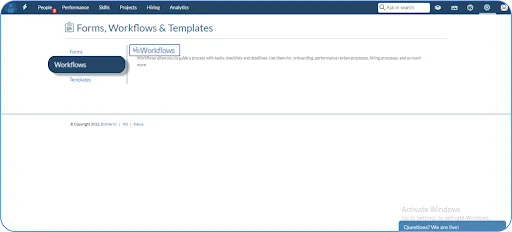
3. Click on New Workflow. Fill in the basic details and then proceed to design.
4. In the designing page, create a new step.

5. As a step choose ‘Completing a Workflow’ and from the list alongside, select the particular workflow.
6. Set an assignee for the workflow which is added as a step. It can be either the assignee of the main workflow, a specific user, or the workflow coordinator of the main workflow.

7. Give the step a title and Description. Add a due date for the step and whether it depends on the completion of another step. These are optional fields.
8. Once done save the step. Similarly, add other steps and complete the workflow.
9. When the main workflow has been assigned, the user can find the main and the second workflow in the list.

10. Now the user can either open the second workflow from the list or from the main workflow.
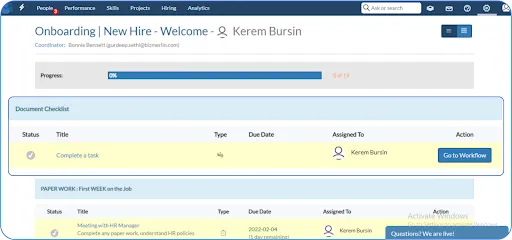
11. Clicking on the ‘Go to Workflow’ would open the workflow in a new tab of the browser.
.webp)