
SalesForce-ClayHR Integration
ClayHR’s integration with the SalesForce application establishes 2-way sync between Salesforce and ClayHR that helps you to do the following: Salesforce accounts are mapped to accounts in ClayHR. Salesforce opportunity records are mapped to projects in ClayHR.Salesforce contacts are mapped to Contacts in ClayHR.
By integrating your Salesforce application with ClayHR, you can establish 2-way sync between Salesforce and ClayHR that works on the following kinds of records:
- Salesforce Accounts are mapped to Accounts in ClayHR
- Salesforce Opportunity Records are mapped to Projects in ClayHR
- Salesforce Contacts are mapped to Contacts in ClayHR
1. Linking SalesForce with ClayHR
- Getting information from SalesForce
- Getting Security Token
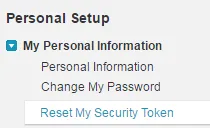
- Login to your SalesForce account.
- Click on the “Settings” menu item under your profile picture, on the top right corner of the menu bar.
- Go to the “Reset My Security Token” option from the left side menu bar: Profile pic->Settings->Reset My Security Token.
- Get a Security token by clicking on the “Reset Security Token” button on the page, you will get a mail in your inbox containing Security Token.
Create a connected app to get Client Id and Client Secret
- Login to your SalesForce account.
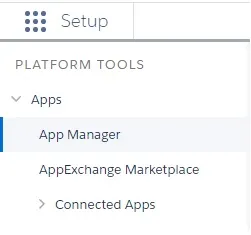
- Click on the Setup icon near your profile picture and click on the Setup menu item.
- Go to the “App Manager” option from the left side menu bar under the Platform Tools section.
- Then click on the New Connected App button on the top right corner: Setup->App Manager->New Connected App.
- Then fill in the required fields in the form and enable OAuth Setting by checking the checkbox in the API (Enable OAuth Settings) section.
- Fill in the callback URL as “https://yourdomain.Clay.net/oauth/salesforce/callback”.
- Also, choose the Full Access option from the “Selected OAuth Scopes” list and click on the Save button.
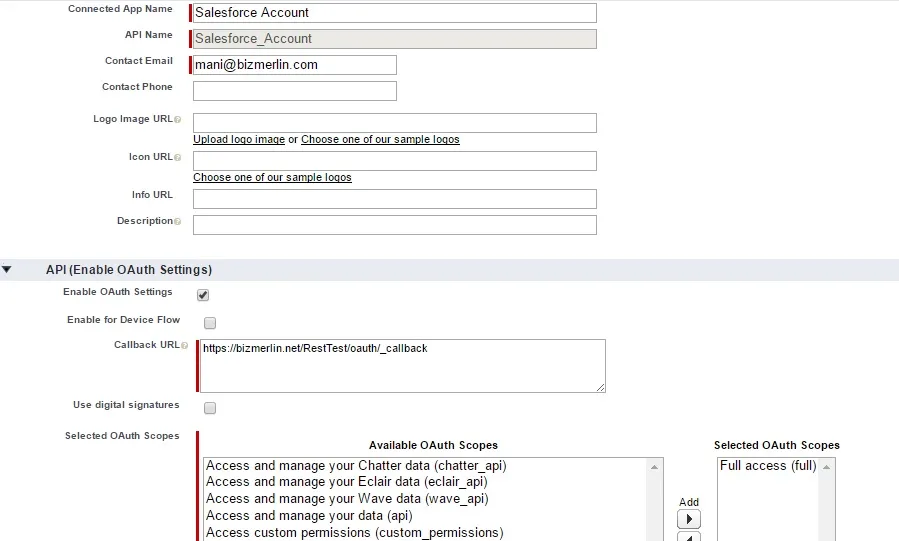
- The Connected app has been created.
- Now you just need to copy the Consumer Key and Consumer Secret from the app (recently created connected app) view page.
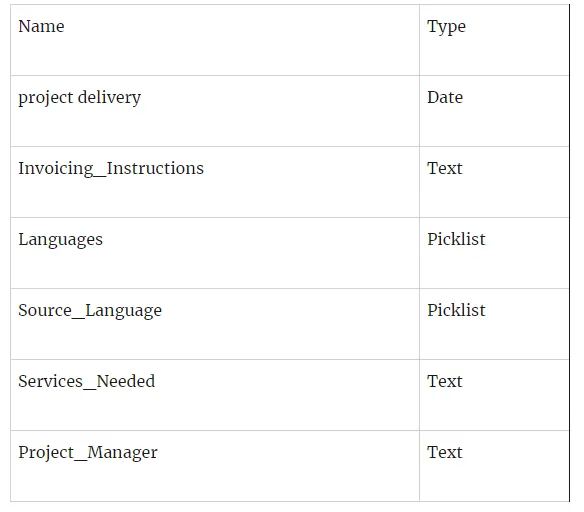
Create Custom fields for Opportunity object on SalesForce:
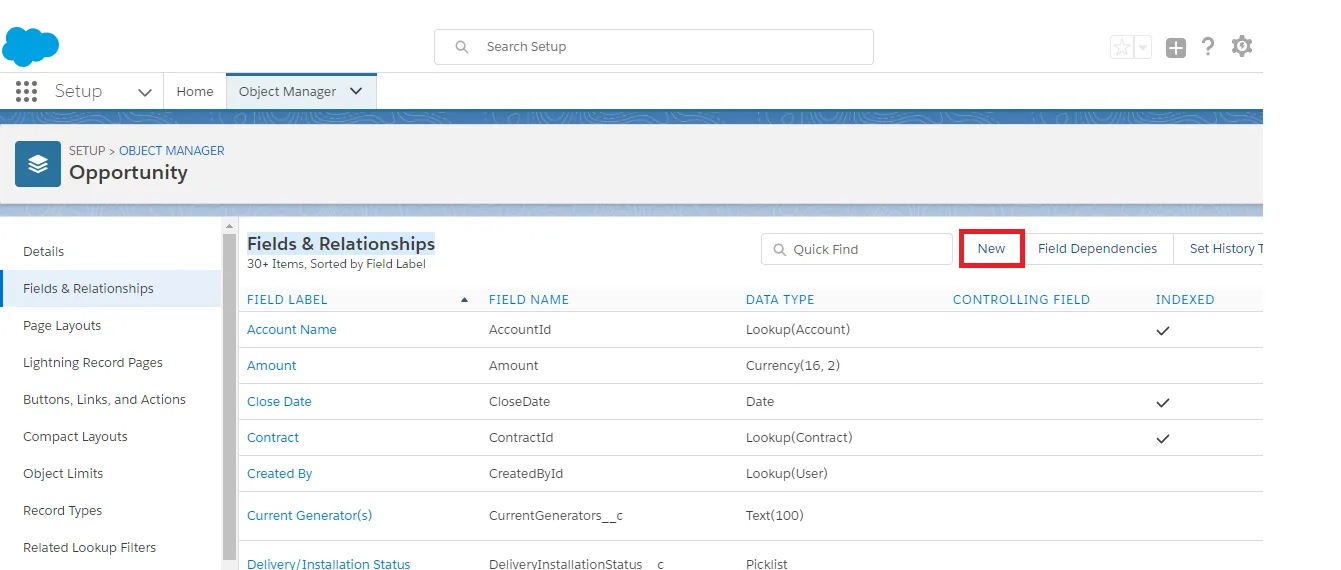
- Go to the top right App Setup menu then go to Objects and Fields> Object Manager on SalesForce.
- Click on the Opportunity object and then select Fields & Relationships. You will see the “New” option. Select “New” to create a new custom field.
- Create the following custom fields:
Setup SalesForce in Third-Party Integrations
- Linking SalesForce in your ClayHR account
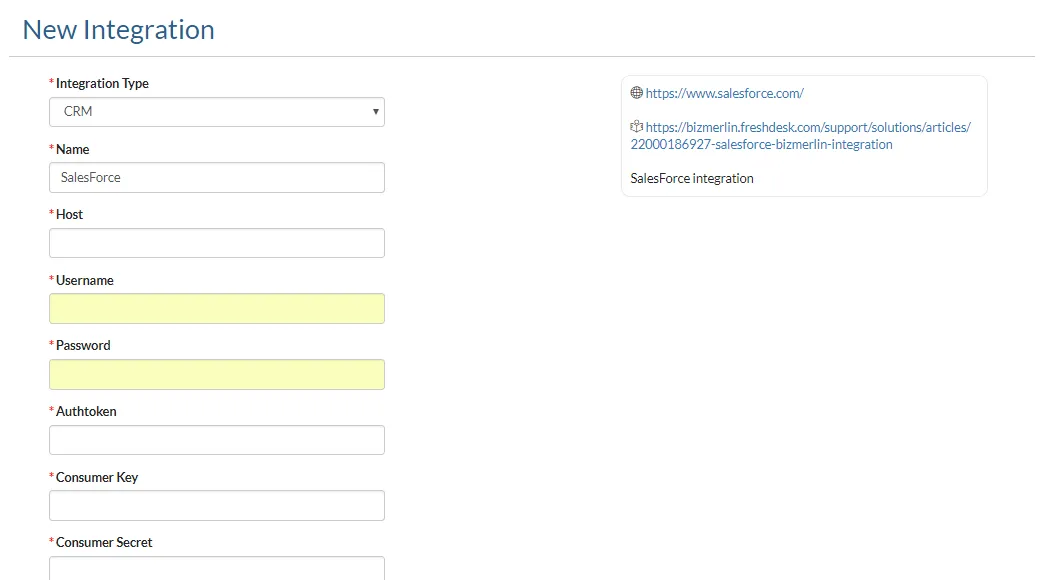
- Go to the top right “Setup” menu and scroll down then click on “Third Party Integrations”: Setup-> Third Party Integrations.
- On the Third-Party Integrations page, click on the button “Add New” and choose “SalesForce”.
- In the field “Host” specify SalesForce account URL as “https://login.salesforce.com“.
- Fill in your Username in field Username and Password in Password field as well as Security Token in Authtoken field.
- Also, fill in Consumer Key in Client Id field and Consumer Secret in Client Secret field. Leave other fields blank.
Creating pull/push functions:
- Select the SalesForce integration on the Third Party Integrations page.
- On the Integration view page, there is a section for creating pull/push functions.
- Click on add function button and select object and function name, then click the save button.
- (If you create a pull function for an account object only then the Pull from SalesForce button will be displayed on the Account home page.)
- Now, you are ready to Integrate with SalesForce.
2. Pull your Accounts from SalesForce into ClayHR
This ClayHR – Salesforce integration allows you to create your Accounts directly from SalesForce into ClayHR.
Pull your SalesForce Accounts into ClayHR
- In ClayHR, go to the top menu “Allocations” and click the “Accounts” menu item.
- Then you can see the “Pull from Salesforce” button on the bottom left of the page if you have configured SalesForce in Third-Party Integrations.
- Clicking on the button will create all your Accounts from SalesForce into ClayHR except those, which are already imported from SalesForce into ClayHR.
- Account Name and Description with SalesForce account ID will be automatically pulled in Account details.
Failure Conditions
- You must specify the correct Username and Password as well as Authtoken of your SalesForce account in Third-Party Integrations.
- Your SalesForce account must be either of type Developer or Enterprise.
Success Outcome
- If Accounts get created in ClayHR, you will find them in the Accounts list by navigating to Allocations->Accounts.
3. Update Account details
This is not currently supported. If you want to modify Account details, you need to modify them directly in ClayHR.
4. Pull your Opportunity from SalesForce into ClayHR
This ClayHR – Salesforce integration allows you to create your Project directly from SalesForce into ClayHR.
- In ClayHR, go to the top menu “Allocations” and click the “project” menu item.
- Then you can see the “Pull from Salesforce” button in the top right corner of the page if you have configured SalesForce in Third-Party Integrations.
- Clicking on the button will create all your Opportunities from SalesForce into ClayHR except those, which are already imported from SalesForce into ClayHR.
- Project Name and Description with SalesForce Opportunity id will be automatically pulled in Project details.
Failure Conditions
- You must specify the correct Username and Password as well as Authtoken of your SalesForce account in Third-Party Integrations.
- Your SalesForce account must be either of type Developer or Enterprise.
- You must have to create a custom field on Salesforce for Opportunity object.
Success Outcome
- If Projects get created in ClayHR, you will find them in the Projects list by navigating to Allocations->Projects.


