ADP-ClayHR Integration
Overview
ClayHR’s integration with the ADP Marketplace empowers clients to effortlessly access and subscribe to a variety of ADP applications, such as ADP Run and ADP Workforce Now. This integration is designed to streamline key payroll processes, including the automatic synchronization of user data (push user) and the efficient retrieval of payroll information (pull payroll run). By leveraging this integration, organizations can enhance their payroll management, ensuring accuracy and reducing manual effort. This comprehensive guide provides a step-by-step walkthrough to help you seamlessly set up and configure the integration between ClayHR and ADP Marketplace, enabling a smoother, more efficient payroll experience.
How to setup the integration
1. Access the Setup Menu: Navigate to the Setup menu and select ‘Third Party Integrations’ from the available options.

2. View Available Integrations: A list of all third-party integrations will be displayed on the screen, allowing you to review the available options.

3. Initiate New Integration: Click on ‘New Integration’ to begin setting up the ADP integration. From the Integration Type dropdown menu, choose Payroll.
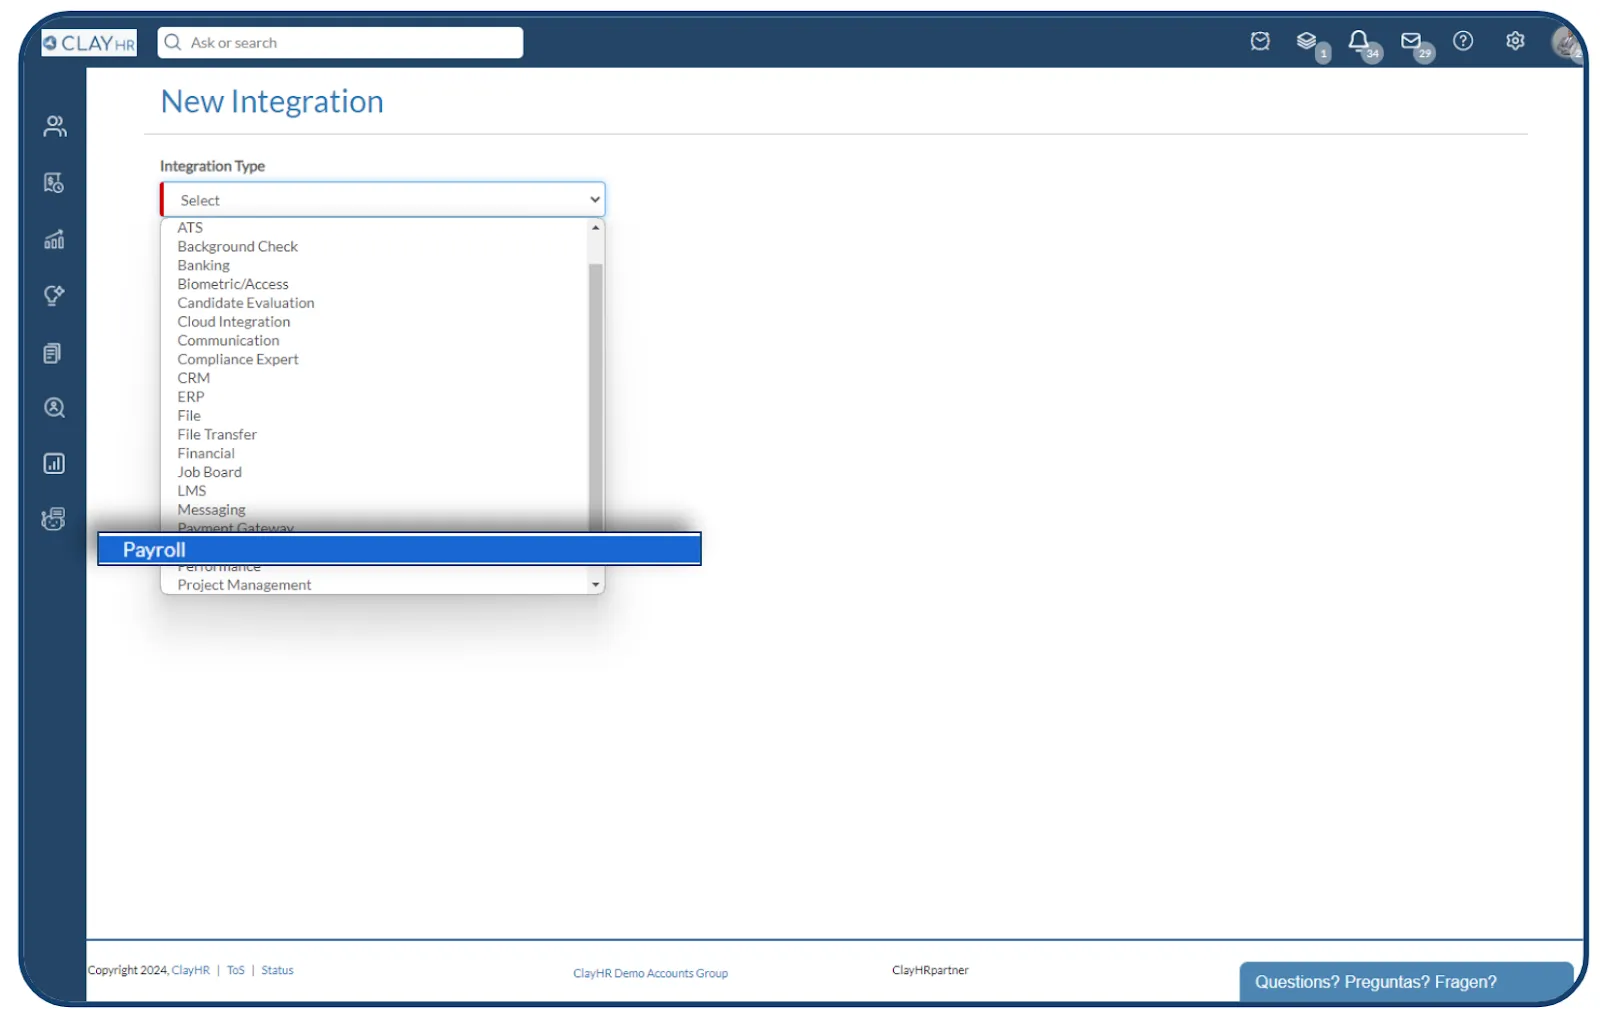
4. Select Payroll Integration: Upon selecting the payroll option, a list of all available payroll integrations will be provided.
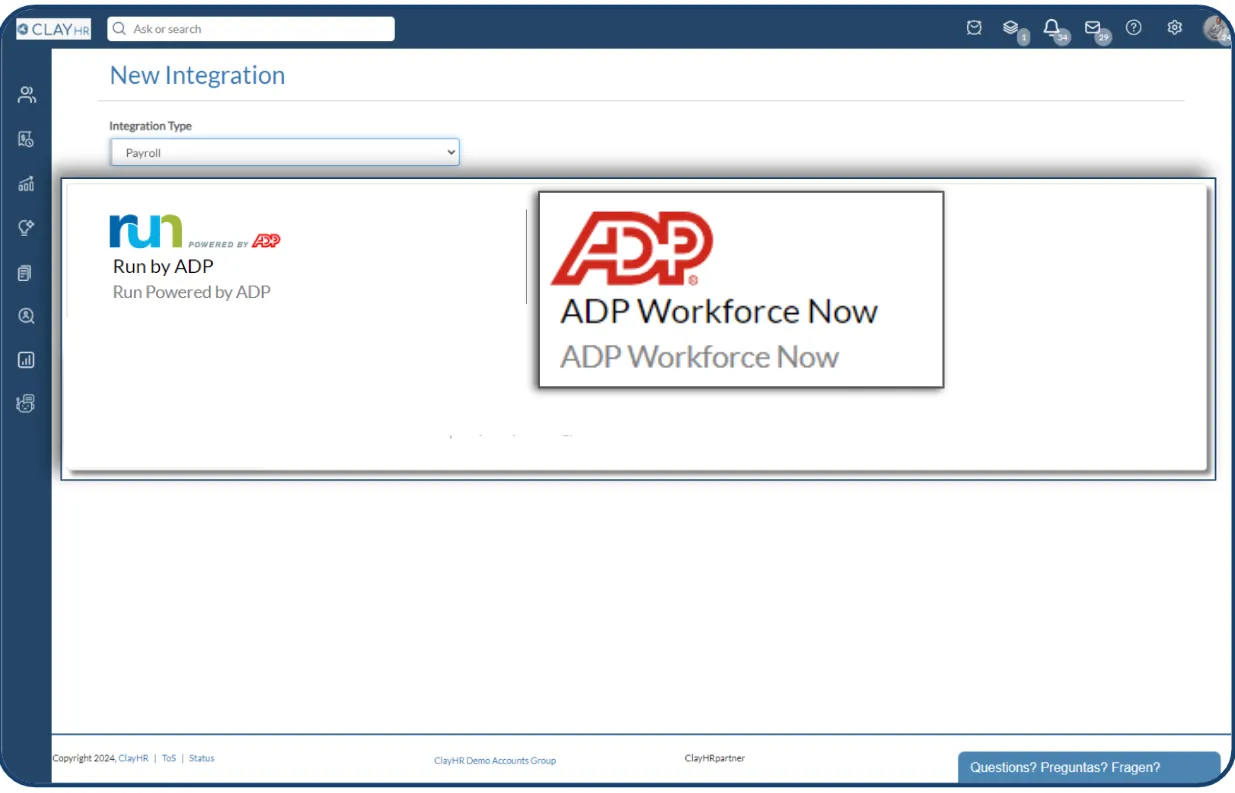
5. Choose ADP Application: Select either ADP RUN or ADP Workforce Now, depending on the ADP Marketplace product you are using. You will then need to input the App ID.

6. Test Connectivity: To verify that the connection has been established correctly, click on the Test Connectivity button.

7. Verify Connection: If the connection is successful, a confirmation message will appear, indicating that the integration has been established properly.
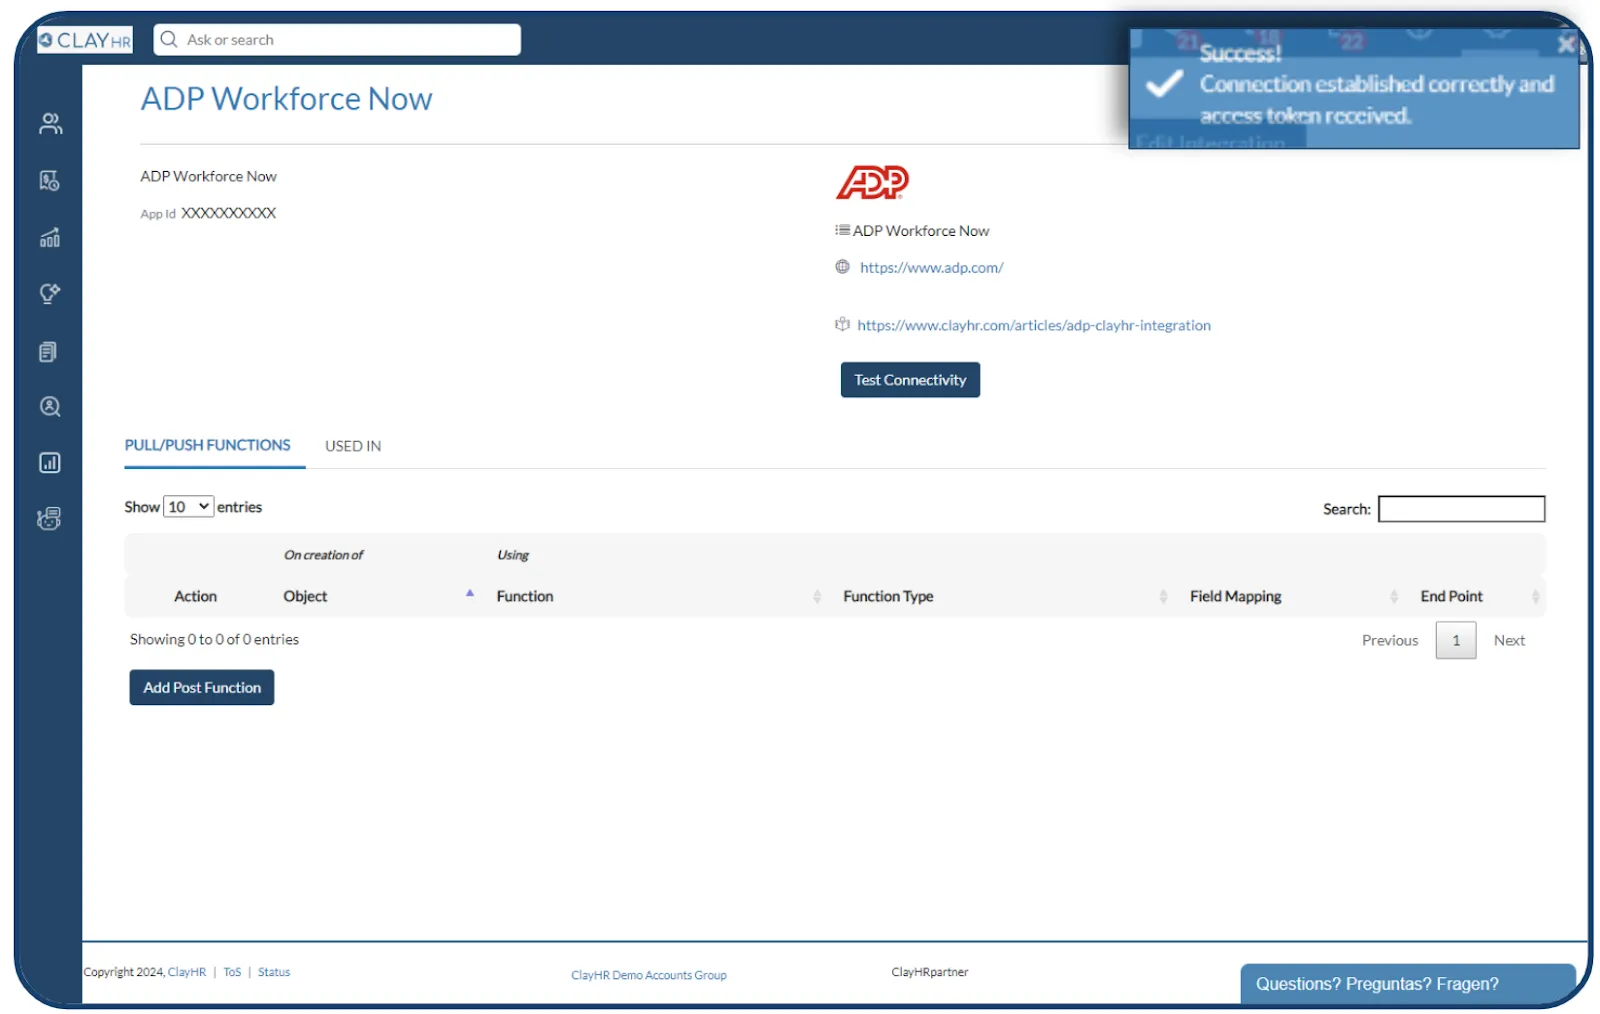
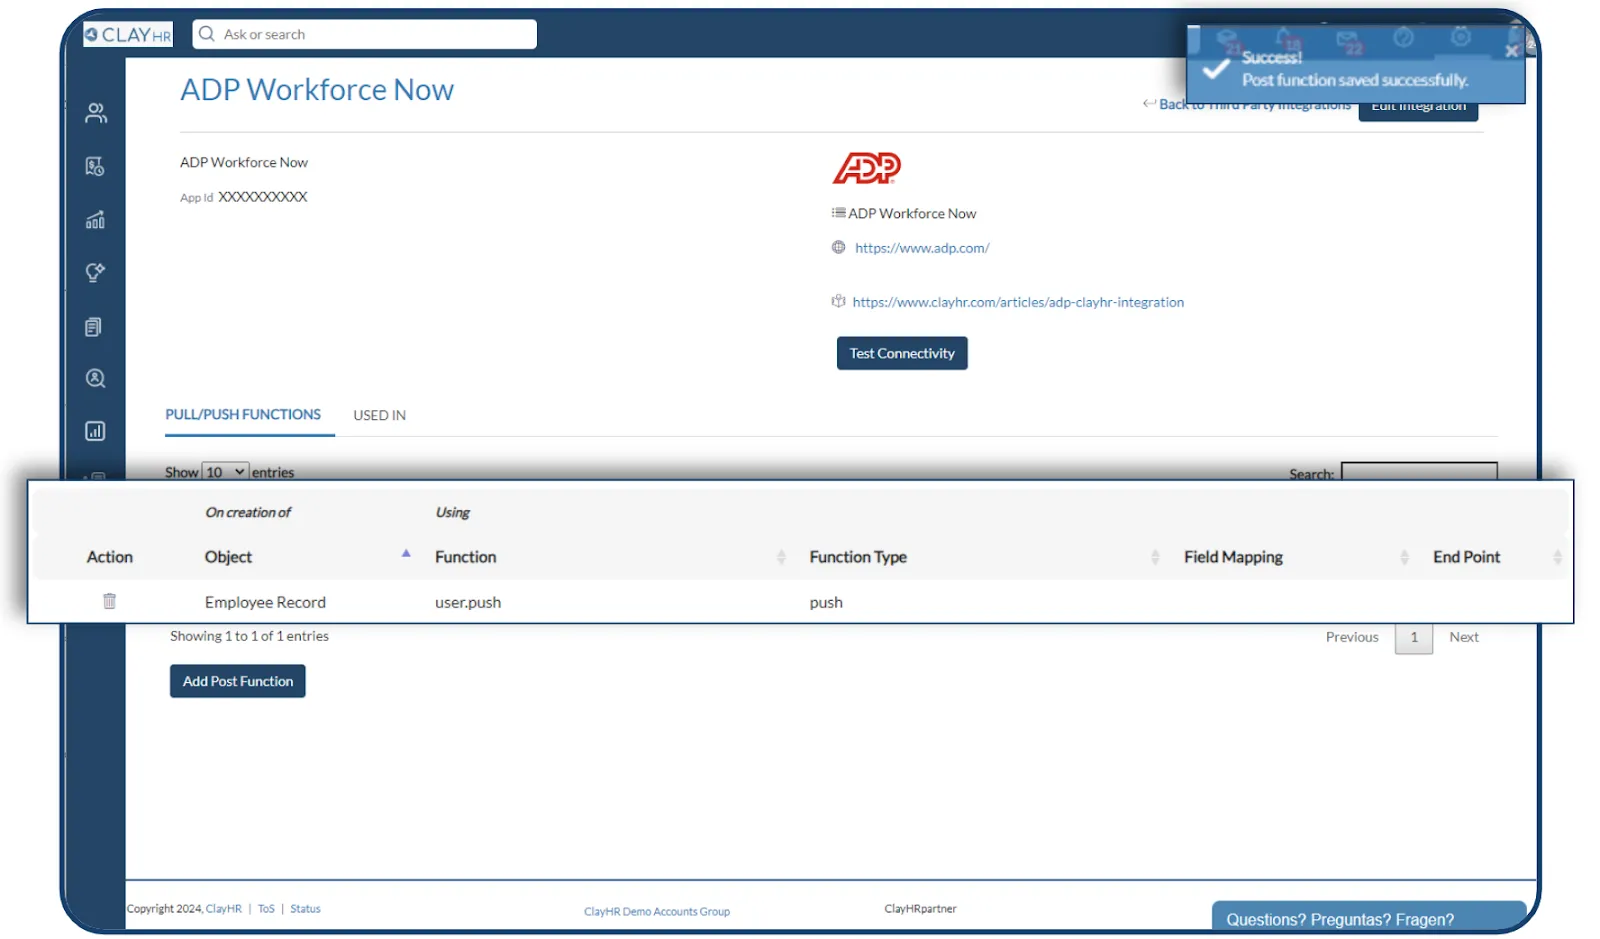
8. Add Push/Pull Operations: Click on Add Post Function to configure the push/pull operations associated with the integration.
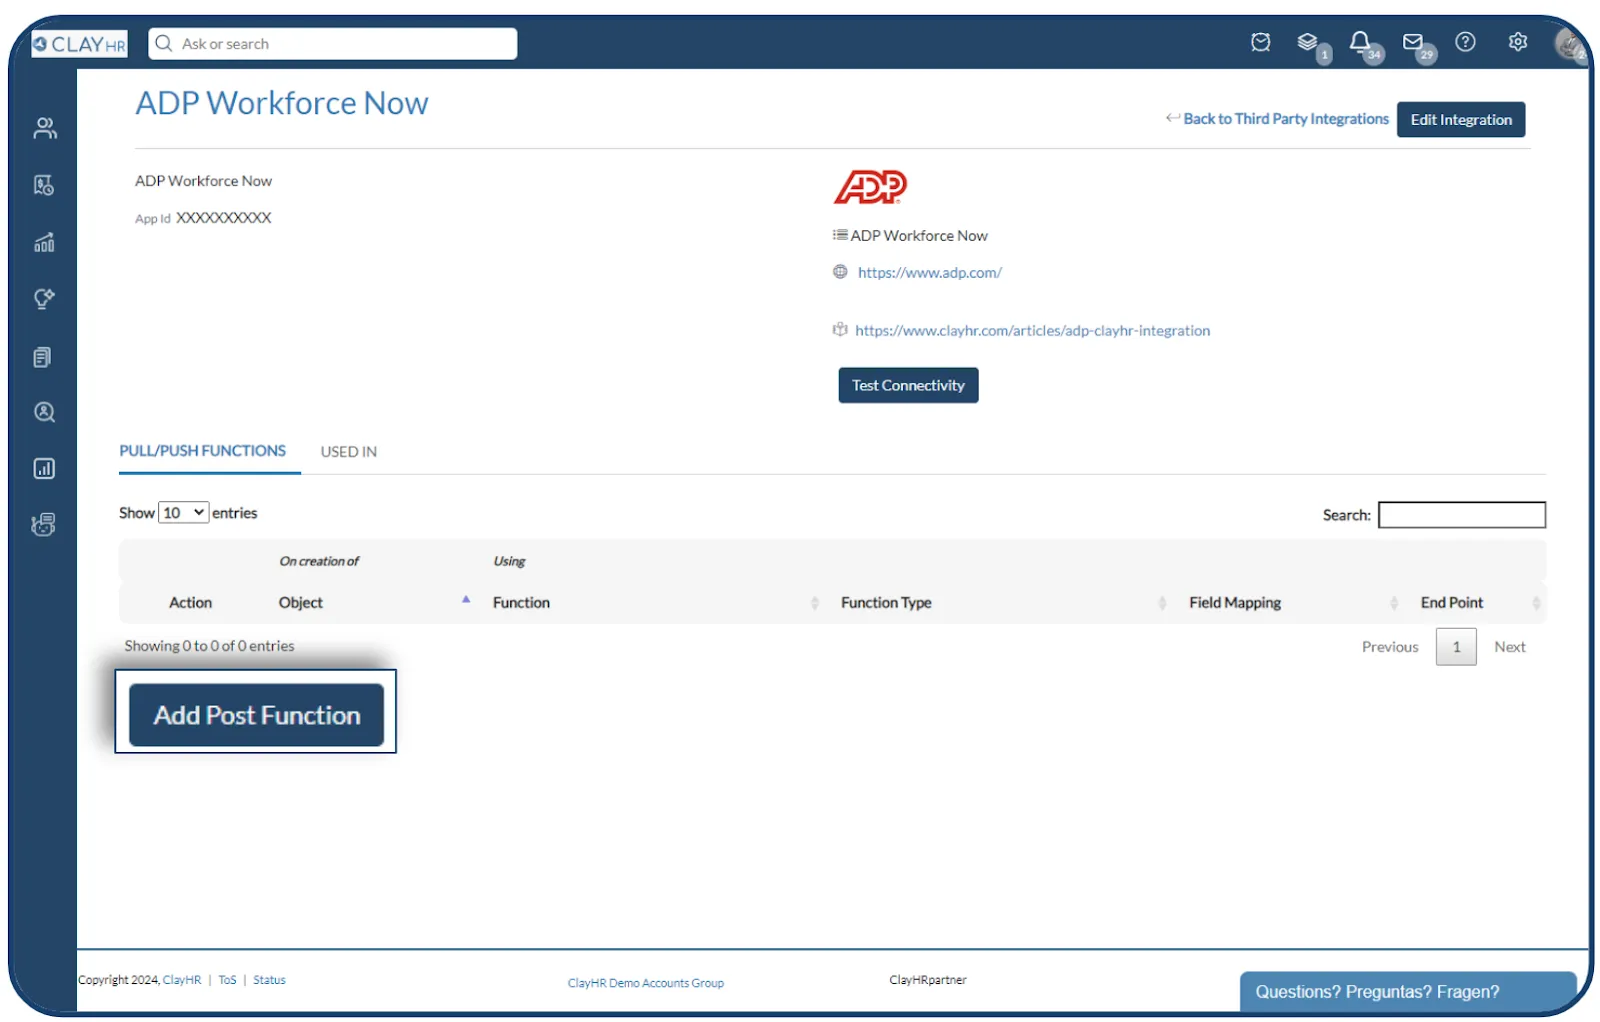
9. Review Saved Operations: The operations you save will be listed in the Pull/Push Functions table, providing a clear overview of the actions linked to your integration.
Push User to ADP
Field Mapping for Pushing a User to ADP
After the integration is successfully set up, the following fields are mapped when a user is pushed to ADP:
- Given Name: The user's first name.
- Family Name: The user's last name or surname.
- Middle Name: The user's middle name, if applicable.
- Email Address: The user's primary email address.
- Address: The user's residential or mailing address.
- Hire Date: The date the user was hired by the company.
- Government IDs: The user's government-issued identification numbers, as required.
Additionally, the following custom fields are also mapped:
- Company Code: The ADP-specific company code, mapped to the custom field Adp.company.code.
- Onboarding Template Code: The code for the ADP onboarding template, mapped to the custom field adp.onboarding.template.code.
These fields ensure that the necessary information is accurately transferred to ADP during the push process.
Steps to push user to ADP
- Access the Employee Record: Navigate to the specific employee record and click on the Admin tab. Within this section, you will find a link labeled Push User to ADP Workforce Now.

- Execute the Push Operation: Click on the Push User to ADP Workforce Now link to initiate the process. Once the user data has been successfully pushed to ADP Workforce Now, a confirmation message will appear on the screen, indicating that the operation was completed successfully.

Pull payroll from ADP
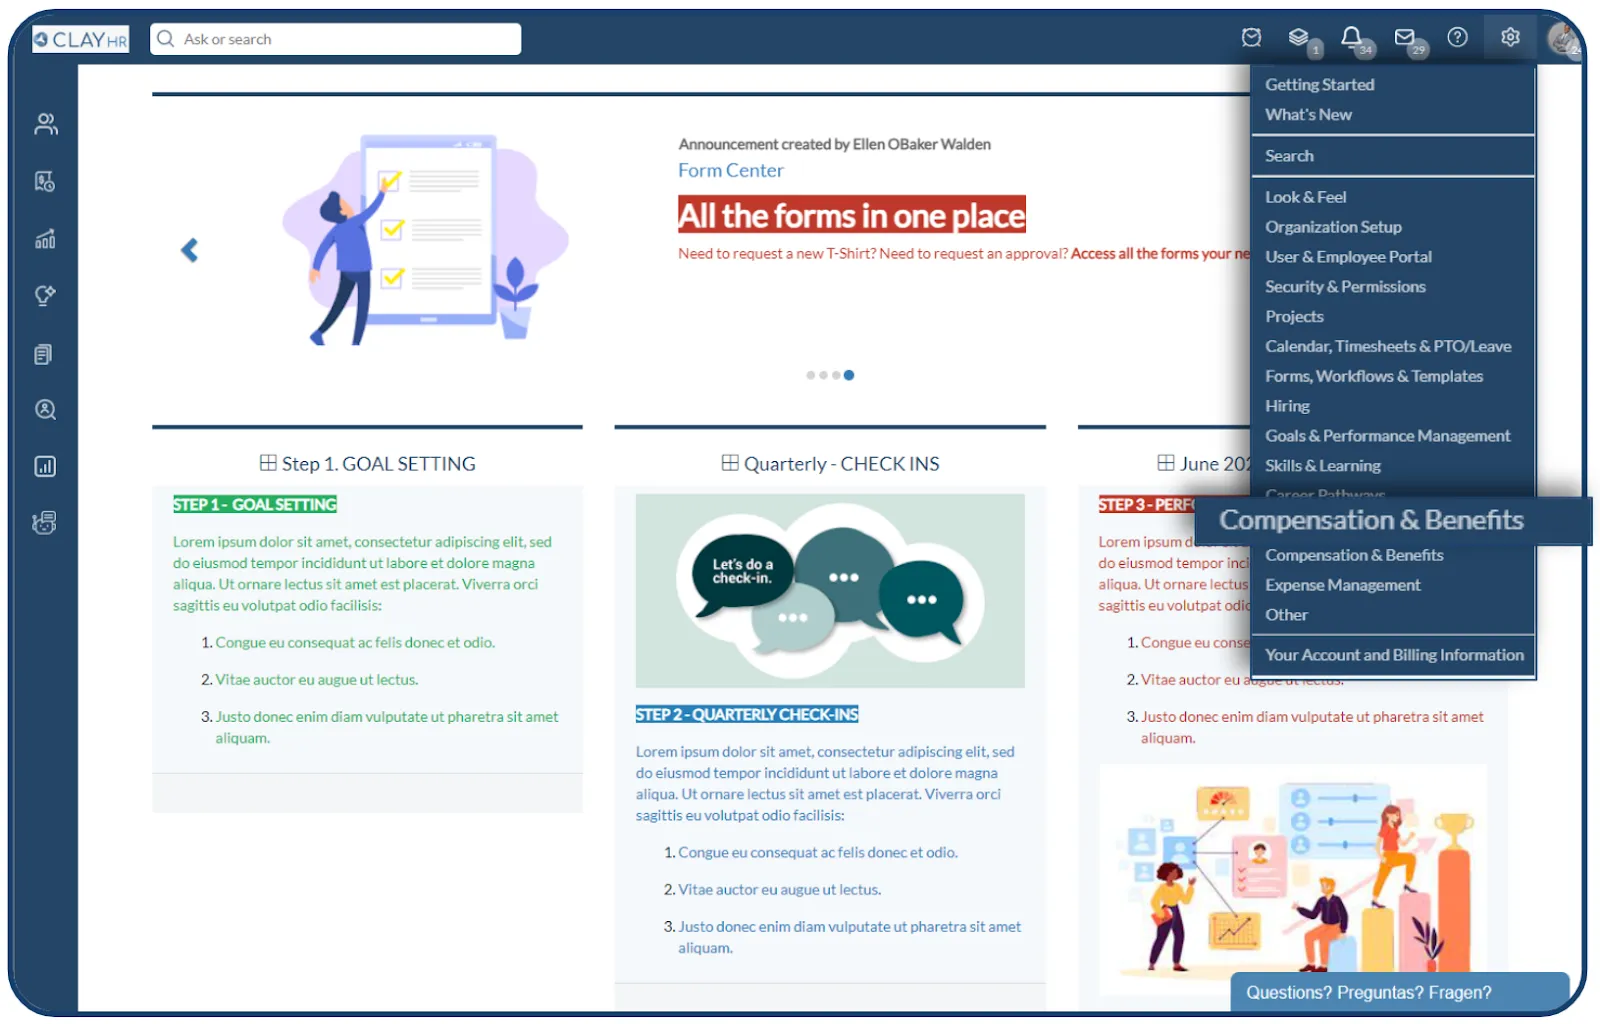
- Access the Setup Menu: Navigate to the Setup menu and click on the Compensation and Benefits link to begin the process.
- Initiate Payroll Pull: From the Compensation and Benefits section, click on Pull Payroll From ADP.
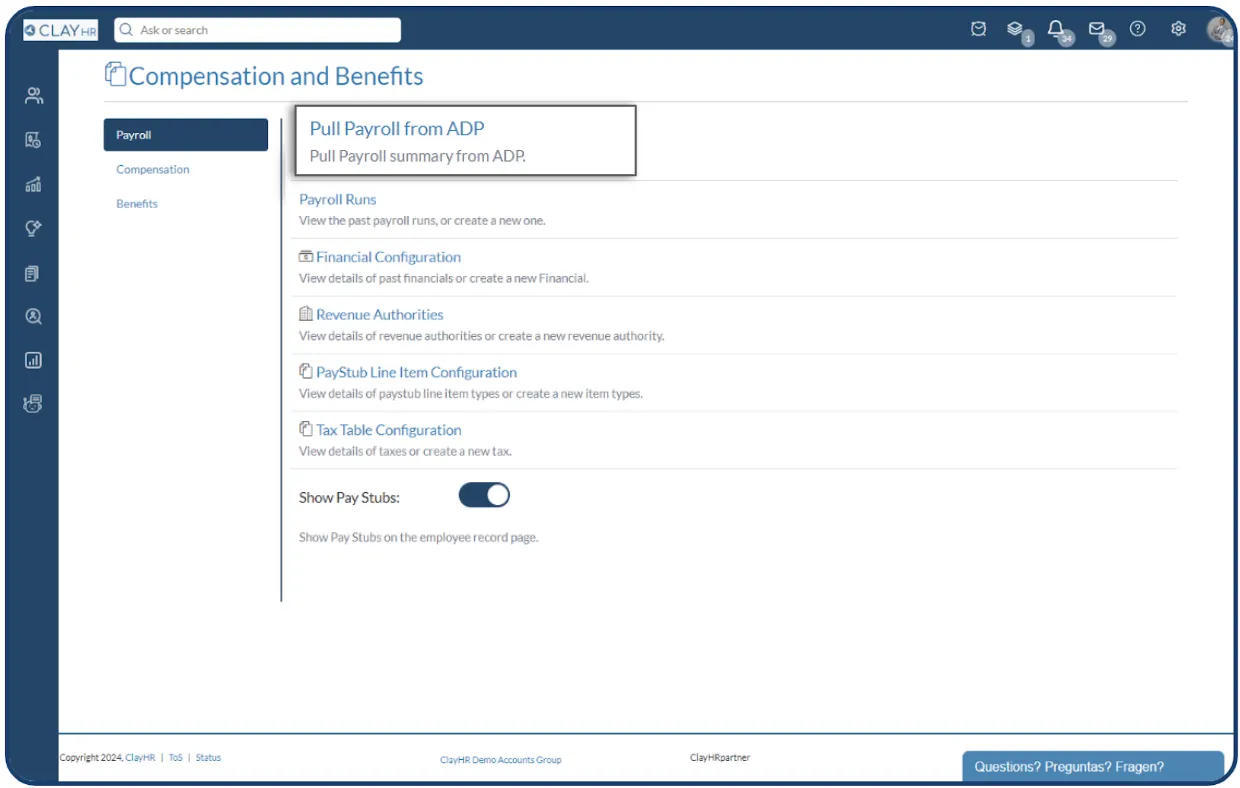
- Select Date Range: A popup window will appear prompting you to select the desired date range for pulling payroll data from ADP. Specify the appropriate dates and click Pull Payroll.

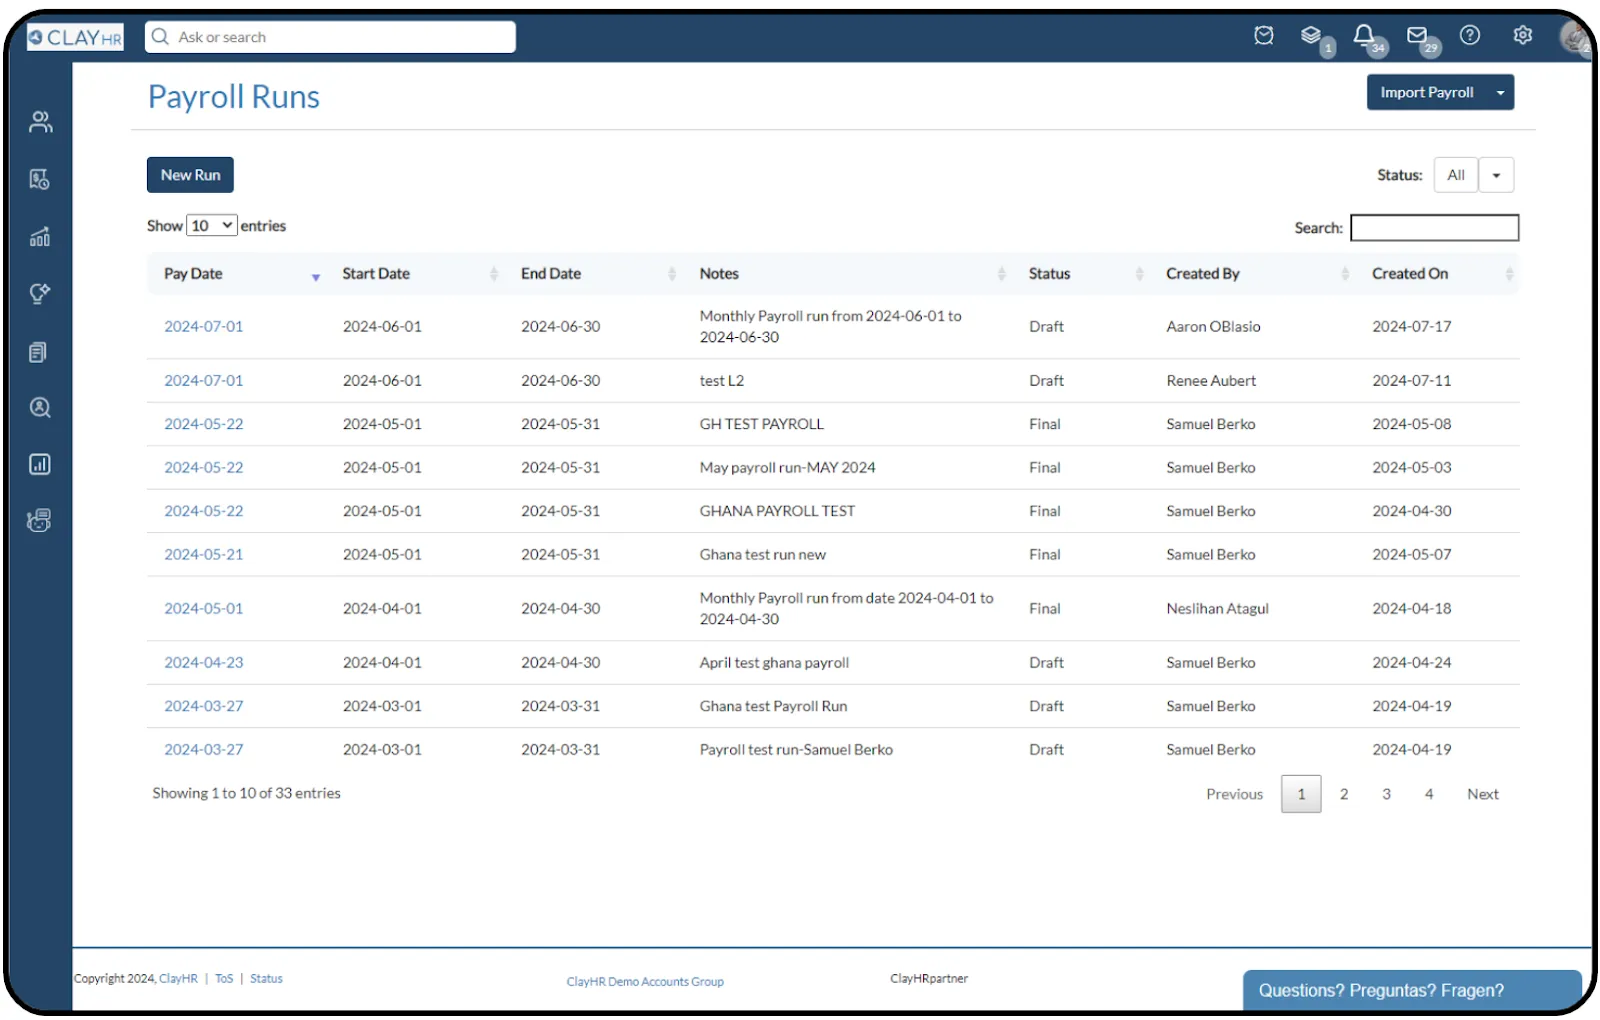
- View Payroll Runs: To view the list of payroll runs that have been pulled, click on the Payroll Runs link.

- Review Pulled Payroll Runs: A comprehensive list of payroll runs pulled from ADP will be displayed, providing an overview of the retrieved data.