
QuickBooks Online - ClayHR Integration
I. Linking QuickBooks and ClayHR
- Setup QuickBooks in Third-Party Integrations
Linking QuickBooks in your ClayHR account:
- Go to the top right "Setup" menu and scroll down and click on "Third Party Integrations": Setup-> Third-Party Integrations
- On the Third-Party Integrations page, click on the button “New Integrations” and choose "Financial" from the combo-box.
- Choose 'QuickBooks Online' from the grid.
- Save the Integration.
.webp)
Creating pull/push functions:
- Select the QuickBooks integration on the Third Party Integrations page.
- On the integration view page, there is a section for creating pull/push functions.
- Click on add function button and select object and function name, then click the save button.
- (If you create a pull function for an account object only then the Pull from QuickBooks button will be displayed on the Account home page.)
.webp)
Enable QuickBooks Preference
- Go to the top right "User Icon" menu and scroll down and click on "My Integrations": User Icon -> My Integrations
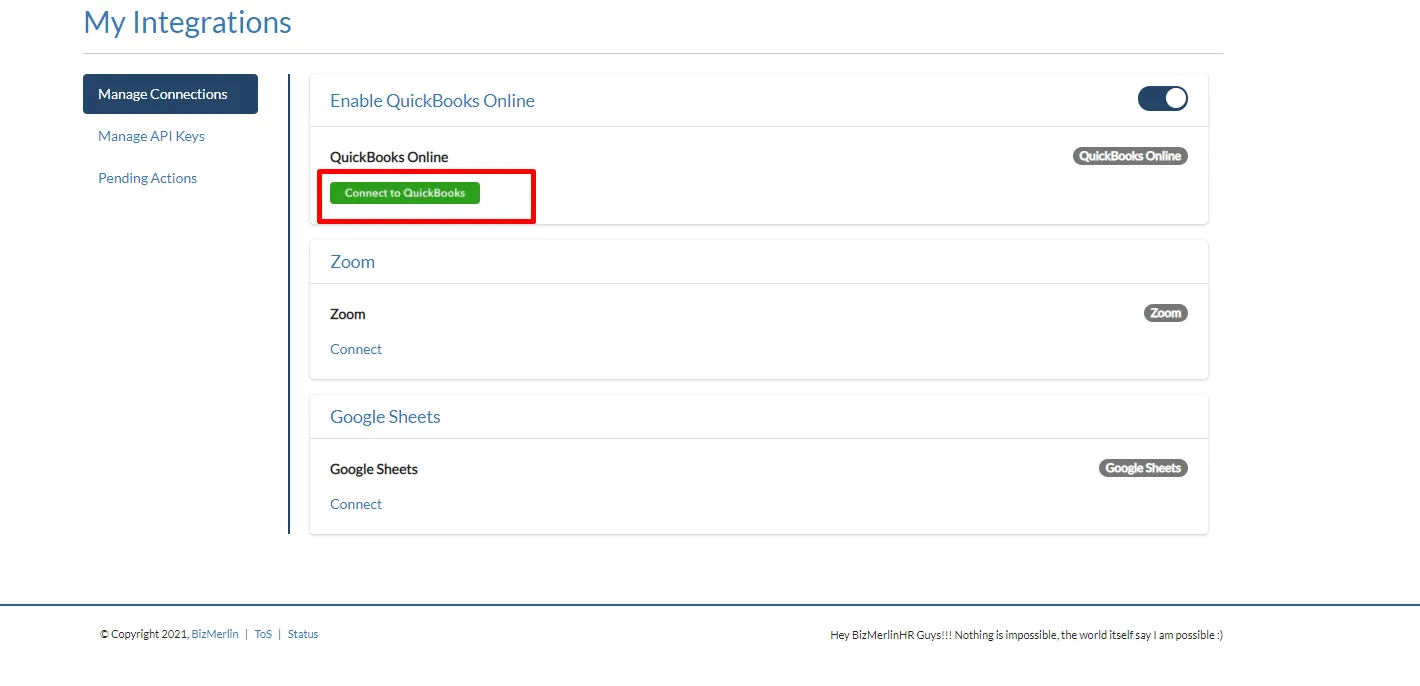
- On the My Integrations page, under the manage connection tab, Switch the toggle. This is a user-specific preference. By default this is disabled in the system if the user wants to use QuickBooks then the user can enable this preference by switching the toggle.

Connect QuickBooks with ClayHR
- After Enabling the preference on the My Integrations page, under the manage connection tab, click on the button “Connect to QuickBooks” and fill in all details for login to QuickBooks account for connectivity.
II. Synchronize Account Details
Note: QuickBooks “Customers” are treated as “Accounts” in ClayHR
This ClayHR- QuickBooks integration allows to sync the creation of “Clients/Accounts”:
Option 1: Pull "Customers” from QuickBooks
- In ClayHR, go to the top menu “Account”.
- Click Connect to QuickBooks button and fill in all details for login to QuickBooks account for connectivity.
- After the authorization step, click pull from the QuickBooks button. Your all QuickBooks Customers will be saved in ClayHR.
- The Customer ID and Customer Balance of QuickBooks are saved in custom fields for Accounts respectively.
Option 2: Creating New "Accounts” in ClayHR and push to QuickBooks
- In ClayHR go to the top menu Allocation then click “Account” and click “New Account”
- Fill in all the required fields and click the save Account button
- On the account view page, click on the link "Push account details to QuickBooks Online" to push the account details to QuickBooks.
- The Client ID generated by QuickBooks will automatically be pulled to ClayHR’s QuickBooks Account ID field.
- In the same way, we can update the account details in ClayHR and click on the link "Push account details to QuickBooks Online" to push the updated account details to QuickBooks.
Option 3: Creating ClayHR new accounts with existing clients in QuickBooks
- If the client already exists in QuickBooks (and therefore already has a client ID) go to the top menu “Account” and click “New Account”
- To link the existing client in QuickBooks with the Account in ClayHR, fill in the QuickBooks Account ID with the corresponding QuickBooks client ID and save the Account.
III. Synchronize Invoice Details
This ClayHR- QuickBooks integration allows to sync the creation of “Clients/Accounts”:
Option 1: Pull "Invoices” from QuickBooks
- In ClayHR go to the top menu Allocation then click “Projects” and set up the Account that is already pushed to QuickBooks Online.
- Fill in all the required fields and click the save project button.
- On the project view page, go to the invoice tab click on pull invoices from the QuickBooks button
- The invoice ID generated by QuickBooks will automatically be pulled to ClayHR’s QuickBooks Invoice ID field.
Option 2: Push "Invoices” to QuickBooks
This feature provides the ability to push Invoices to your QuickBooks account. To push Invoice details to the QuickBooks account follow these steps:
- In ClayHR go to the top menu “Allocation” then click Projects and select the project in which you want to push invoice details.
- On the project view page, under the invoices tab, click "New Project Invoice".
- Fill in all the required fields and click the save Invoice button (Please note that the account selection is mandatory for creating the invoice on QuickBooks. Also, before creating an invoice, you have to push the selected account details to QuickBooks only then the push invoice details to the QuickBooks link will be active otherwise it will be disabled on the invoice view page).
- On the invoice view page, click on the link "Push invoice details to QuickBooks Online" to push the invoice details to QuickBooks.The invoice ID generated by QuickBooks will automatically be pulled into ClayHR’s QuickBooks Invoice ID field.
IV. Synchronize Project Details
This ClayHR- QuickBooks integration allows to sync the creation of “Clients/Accounts”:
Option 1: Pull "Projects” from QuickBooks
- In ClayHR go to the top menu Allocation then click “Projects” and add up the Account in that project that is already pushed to QuickBooks Online.
- Fill in all the required fields and click the save project button.
- On the project home page, click on the pull from QuickBooks button
- All the existing projects are updated or new ones are pulled from the QuickBooks account.
Option 2: Push "Projects” to QuickBooks
This feature provides the ability to push projects to your QuickBooks account. To push project details to QuickBooks account follow these steps:
- In ClayHR go to the top menu “Allocation” then click Projects and select the project in which you want to push.
- On the project view page, under the action tab, click on the "Push to QuickBooks Online" link.
- Fill in all the required fields and click the save project detail button (Please note that the account selection is mandatory for creating the project on QuickBooks. Also, before pushing a project, you have to push the selected account details to QuickBooks only then you will be able to push project details to QuickBooks.
V. Synchronize User Details
Note: QuickBooks “Employees” are treated as “User” in ClayHR
This ClayHR- QuickBooks integration allows to sync the creation of “Employees/Users”:
Creating New "User” in ClayHR and push to QuickBooks
- In ClayHR go to the left menu “People”, go to the “Directory” menu item, and then click "New Person".
- Fill in all the required fields below and click Add User button
- First Name: The user's first name.
- Last Name: The user's last name or surname.
- Email Address: The user's primary email address.
- Phone Number: The user's primary phone number.
- On the user view page, under the admin tab, click on the link "Push User to QuickBooks Online" to push the account details to QuickBooks.
- The Employee ID generated by QuickBooks will automatically be pulled to ClayHR’s QuickBooks User ID field.
- In the same way, we can update the user details in ClayHR and click on the link "Push User to QuickBooks Online" to push the updated user details to QuickBooks.
Hope this works.


