
Administración de los menús de las aplicaciones
El Menú de aplicaciones en ClayHR controla la experiencia de navegación de los usuarios: qué módulos aparecen en la barra lateral izquierda o en el menú superior y cómo está organizado el sistema para su uso diario.
El Menú de aplicaciones define la experiencia de navegación, mientras que los permisos determinan qué puede hacer un usuario, el menú de la aplicación determina lo que ven inicialmente al navegar por el sistema.
Dentro del ClayHR más grande marco de permisos—incluyendo Grupos de usuarios, el Matriz de permisos, Ajustes avanzados, Permisos de campo personalizados, y Permisos a nivel de informe—El menú de la aplicación funciona como capa de presentación final. Controla la visibilidad de los módulos y enlaces, pero lo hace no conceder el acceso por sí mismo.
En este artículo:
- Cómo interactúan la visibilidad del menú y los permisos
- Qué controla el menú de la aplicación
- Configuración del menú de la aplicación
- Asignación de menús a los usuarios
1. Cómo interactúan la visibilidad del menú y los permisos
Esta es una distinción fundamental en ClayHR:
✔ Un usuario no verá ningún elemento del menú a menos que esté incluido en el menú de la aplicación asignado para ellos.
Incluso si el usuario tiene permiso total para usar una función, el elemento del menú no aparecerá a menos que el menú de la aplicación incluya el hipervínculo correspondiente.
✔ Sin embargo, los permisos siguen controlando el acceso.
Si un usuario no si tiene el permiso requerido y hace clic en un elemento del menú (o accede directamente a una URL), el sistema bloqueará el acceso.
⚠ Advertencia importante
Si un usuario hace tienen los permisos correctos (habilitados a través de sus grupos de usuarios y la matriz de permisos), es posible que aún puedan acceder a una página directamente a través de su URL, incluso si el elemento del menú está oculto para ellos.
- Ocultar un elemento del menú de la aplicación bloquear el acceso.
- Los permisos determinan el acceso real.
- Los menús determinan la visibilidad y la comodidad de navegación.
Por eso, la configuración del menú siempre debe realizarse junto con la configuración de permisos adecuada.
2. Qué controla el menú de la aplicación
El menú de la aplicación determina:
- Qué módulos y páginas aparecen en la barra de navegación superior o izquierda
- El orden de los elementos del menú
- Agrupación de funciones relacionadas
- Qué versión de menú recibe cada grupo de usuarios o usuario
- Si aparecen enlaces personalizados o herramientas externas en la navegación
Garantiza que los usuarios dispongan de una interfaz limpia y apropiada para su rol.
3. Configuración del menú de la aplicación
Para configurar el menú de la aplicación:
- Ir a Menú de configuración (Icono de engranaje en la parte superior derecha)
- Haz clic en el submenú Look & Feel
- Selecciona la pestaña Menú de aplicaciones
- Crear un menú nuevo o editar uno existente
Cada menú puede ser asignado a usuarios o grupos de usuarios según las necesidades de su organización.
4. Asignación de menús a usuarios o grupos de usuarios
La asignación de menús determina lo que ve un usuario.
- Puede asignar menús a usuarios específicos uno por uno o de forma masiva
- Se pueden asignar usuarios solo un menú a la vez
Resumen
En ClayHR:
- Los permisos definen el acceso
- Los menús definen la visibilidad
Un usuario no puede ver un elemento del menú a menos que esté asignado a su menú de aplicaciones, pero un usuario poder seguirán accediendo a una función a través de una URL directa si tienen los permisos necesarios.
Al combinar la configuración del menú de aplicaciones con los grupos de usuarios y la matriz de permisos, los administradores pueden ofrecer una experiencia de navegación optimizada sin comprometer el control de acceso.
El menú de la aplicación facilita la búsqueda de lo que necesita dentro de la aplicación. Incluye un conjunto predeterminado de menús y submenús para empezar fácilmente. Los usuarios también pueden crear sus propios menús y submenús personalizados para organizar la aplicación de la manera que más les convenga.
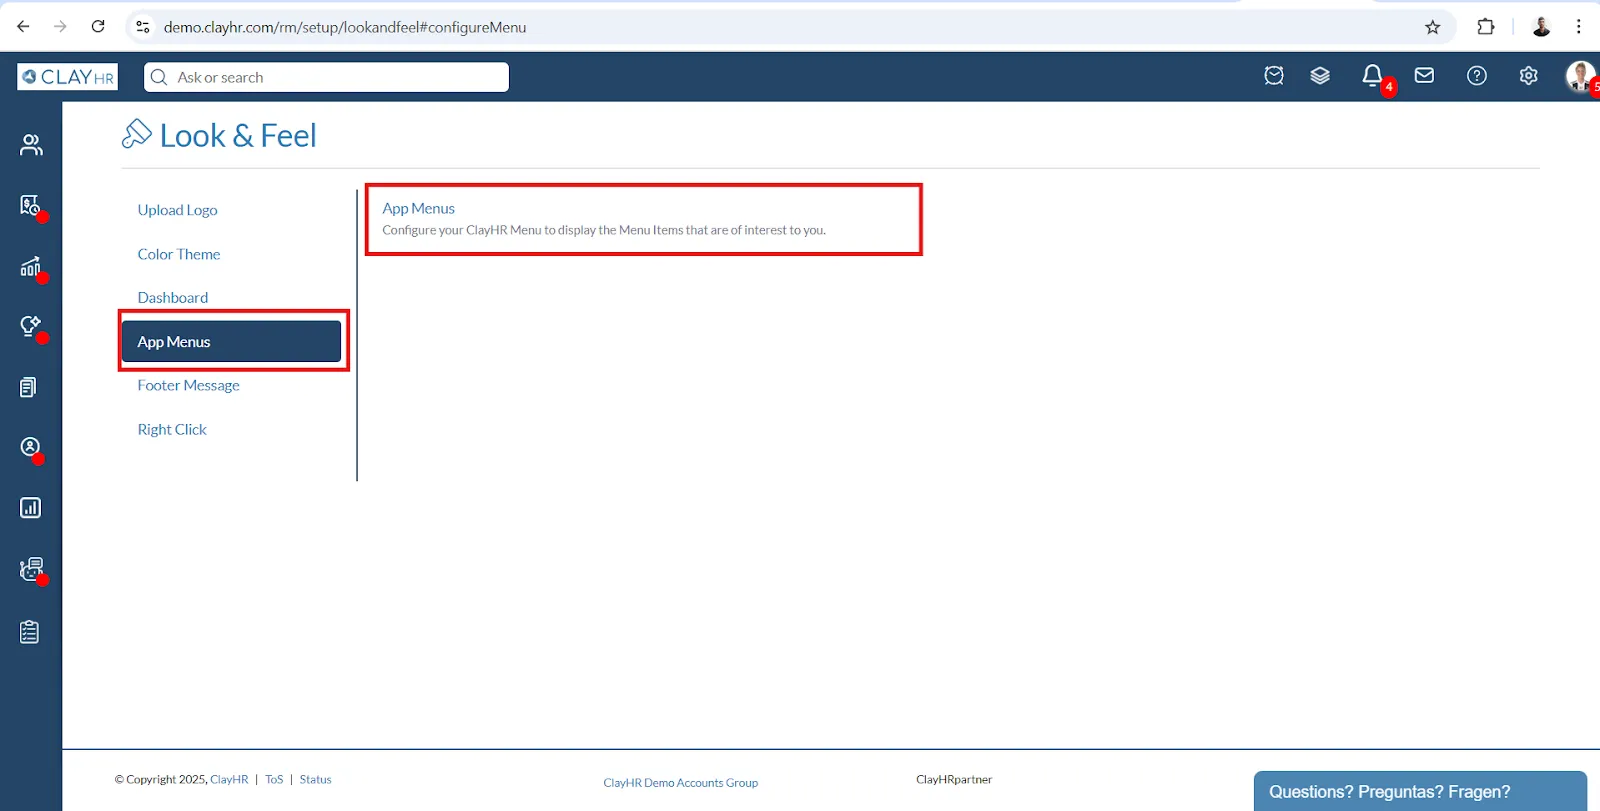
- Navega hasta el icono de «Engranaje» y selecciona «Look & Feel».

- Selecciona «Menús de aplicaciones» y vuelve a hacer clic en «Menús de aplicaciones».
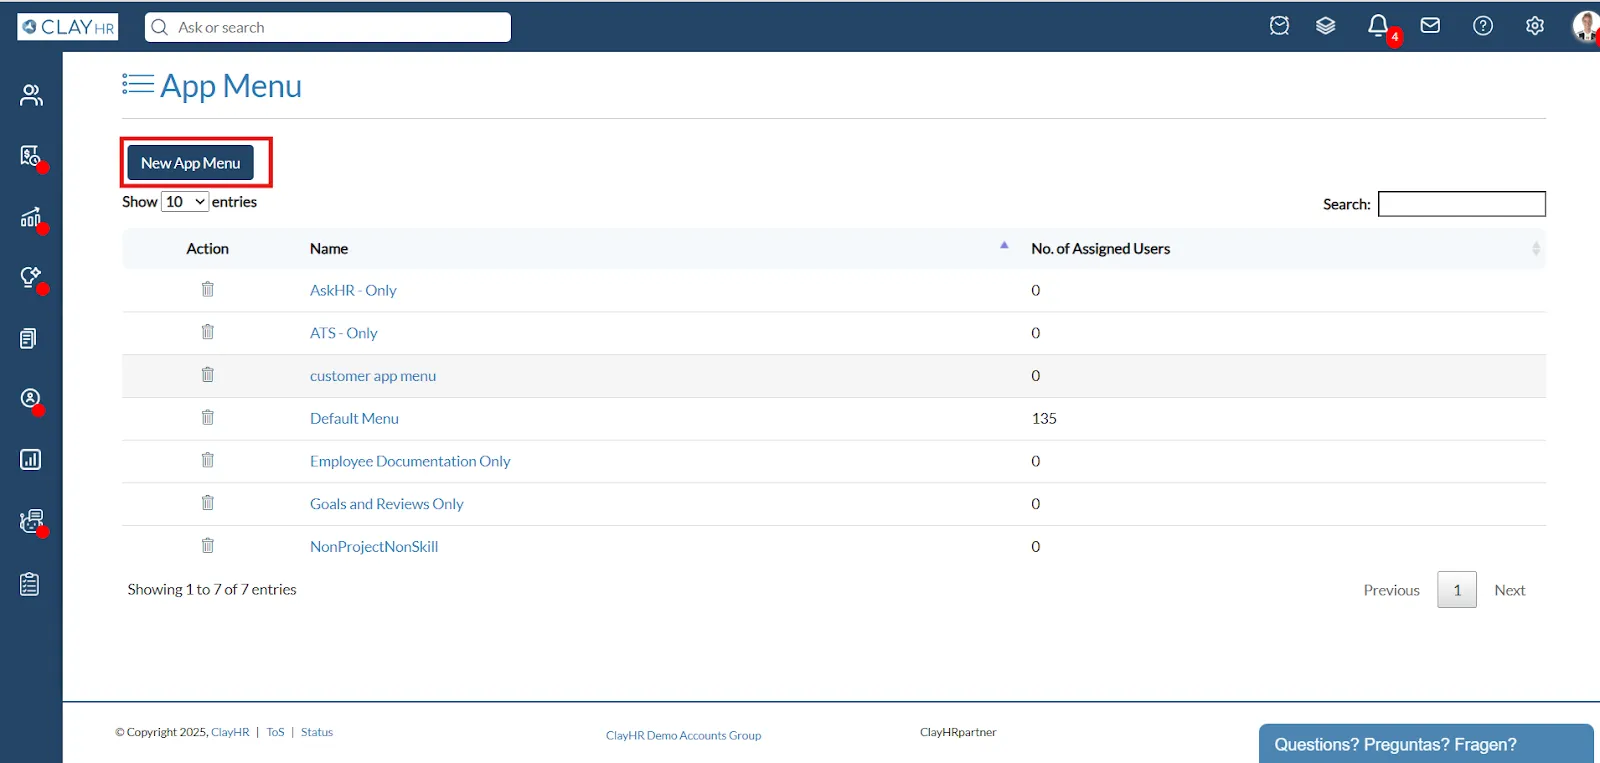
- En la página del menú de la aplicación, haga clic en «Nuevo menú de la aplicación».
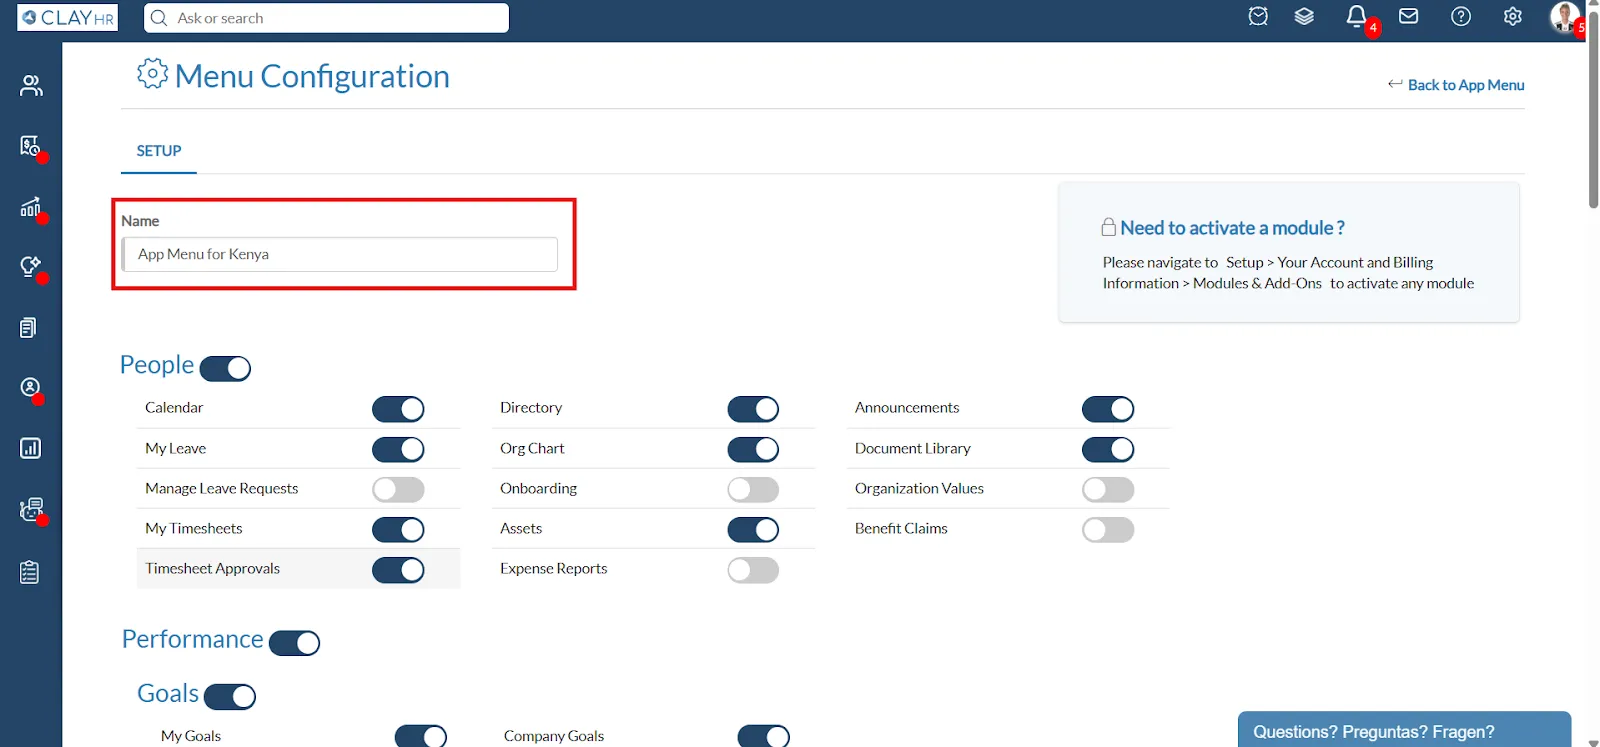
- Nota: Para activar los módulos, vaya a Configuración > Su cuenta e información de facturación > Módulos y complementos.
- En la página de configuración del menú, especifique el nombre del menú de la aplicación (por ejemplo, «Menú de aplicaciones para Kenia») y active o desactive los módulos según sea necesario.
- Nota: Se pueden crear varios menús de aplicaciones en función de, por ejemplo, roles, ubicaciones, etc., y asignarlos a diferentes usuarios.
- Tras la configuración, haga clic en el botón «Guardar configuración».
- Nota: Para desactivar módulos específicos (por ejemplo, «Preguntar a RRHH»), desactívalos y guarda la configuración para garantizar que los usuarios no vean esos módulos.
Cómo asignar los menús de la aplicación
- Una vez guardada la configuración, aparecerá un nuevo menú de aplicaciones en la página de inicio del menú de aplicaciones. Haga clic en el menú de la aplicación recién creado.

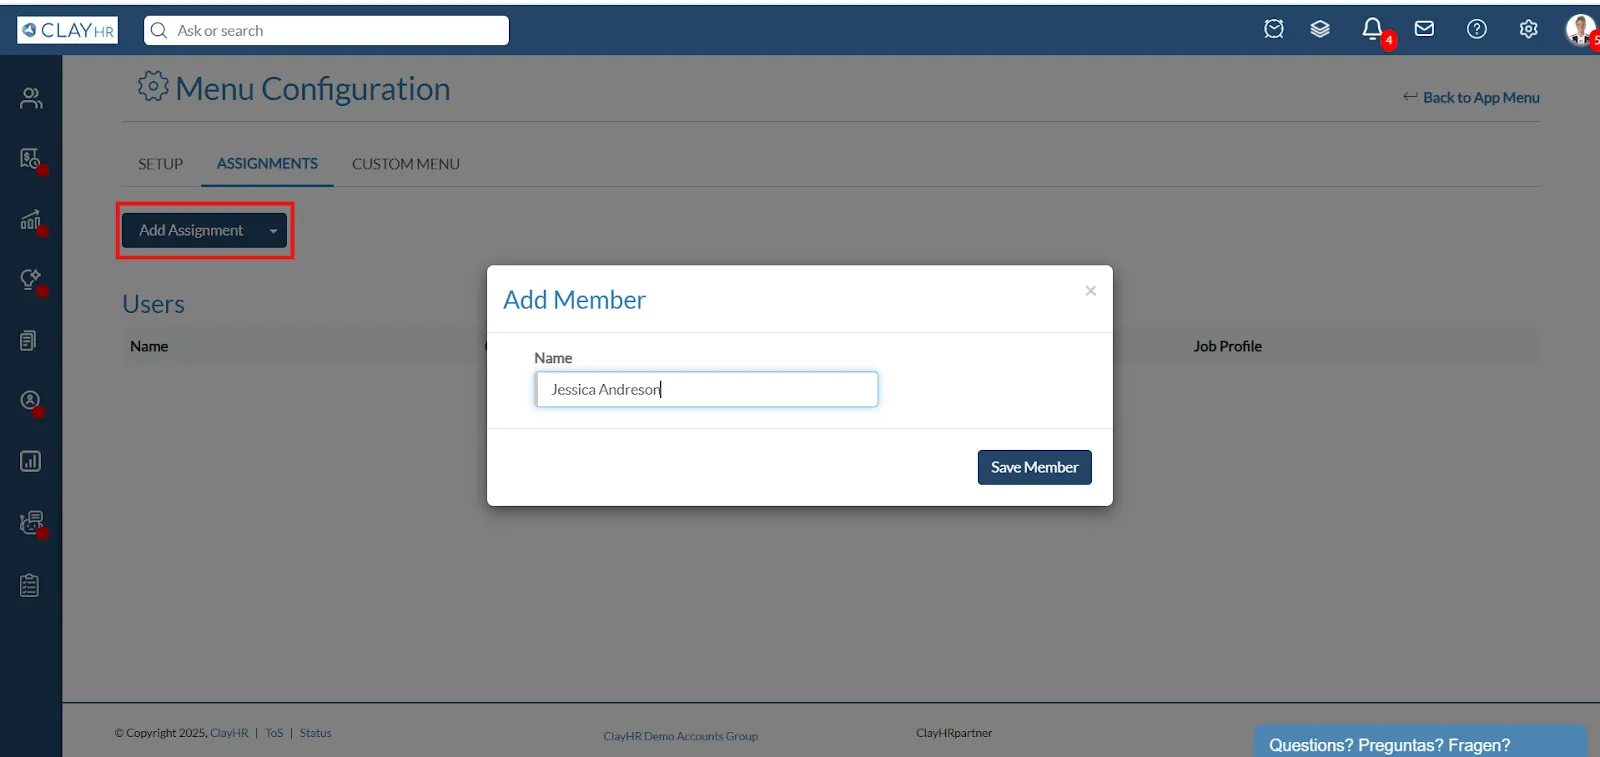
- En la página de configuración del menú, vaya a la pestaña «Asignación».

- Para asignar el menú a usuarios individuales:
- Haz clic en «Añadir tarea» y se abrirá una nueva ventana emergente.
- Introduzca el nombre del usuario al que desea asignar el menú de la aplicación y haga clic en «Guardar miembro».
- Para asignar el menú a los usuarios de forma masiva:
- Siga los pasos descritos en el siguiente enlace para obtener actualizaciones masivas de usuarios Actualización masiva de usuarios.
Cómo crear y eliminar menús personalizados
1. En la página de configuración del menú, vaya a la pestaña «Menú personalizado».

2. Para cambiar el nombre del menú, haga clic en el icono de edición.

3. Aquí puede editar el nombre y actualizar las preferencias del «Menú personalizado».
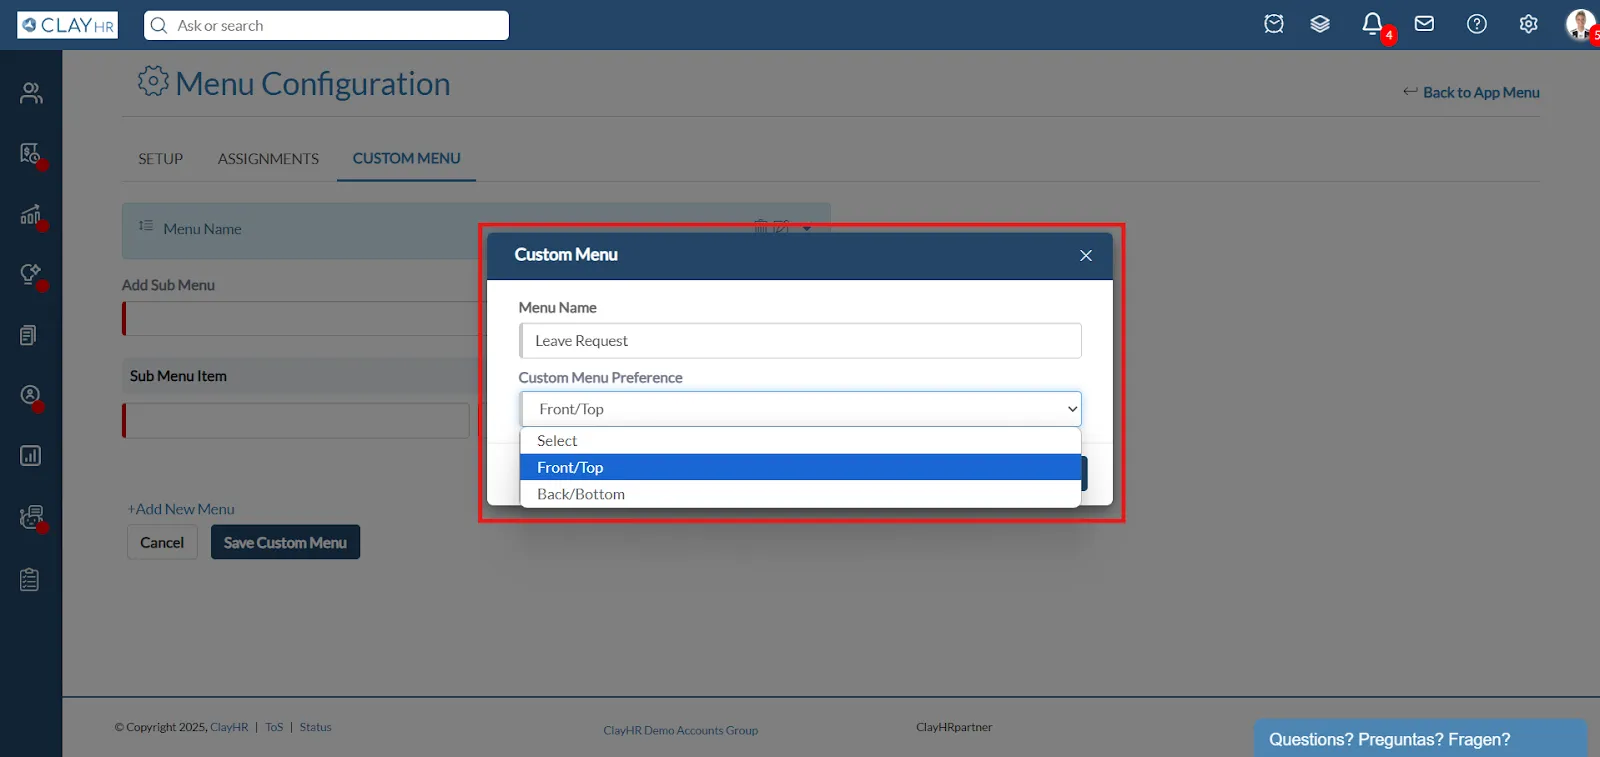
4. Añada el nombre y los hipervínculos a los submenús; por ejemplo, si quiere crear una hora de submenú como PTO, puede simplemente añadir el nombre como PTO y, en el hiperenlace, añadir la URL.
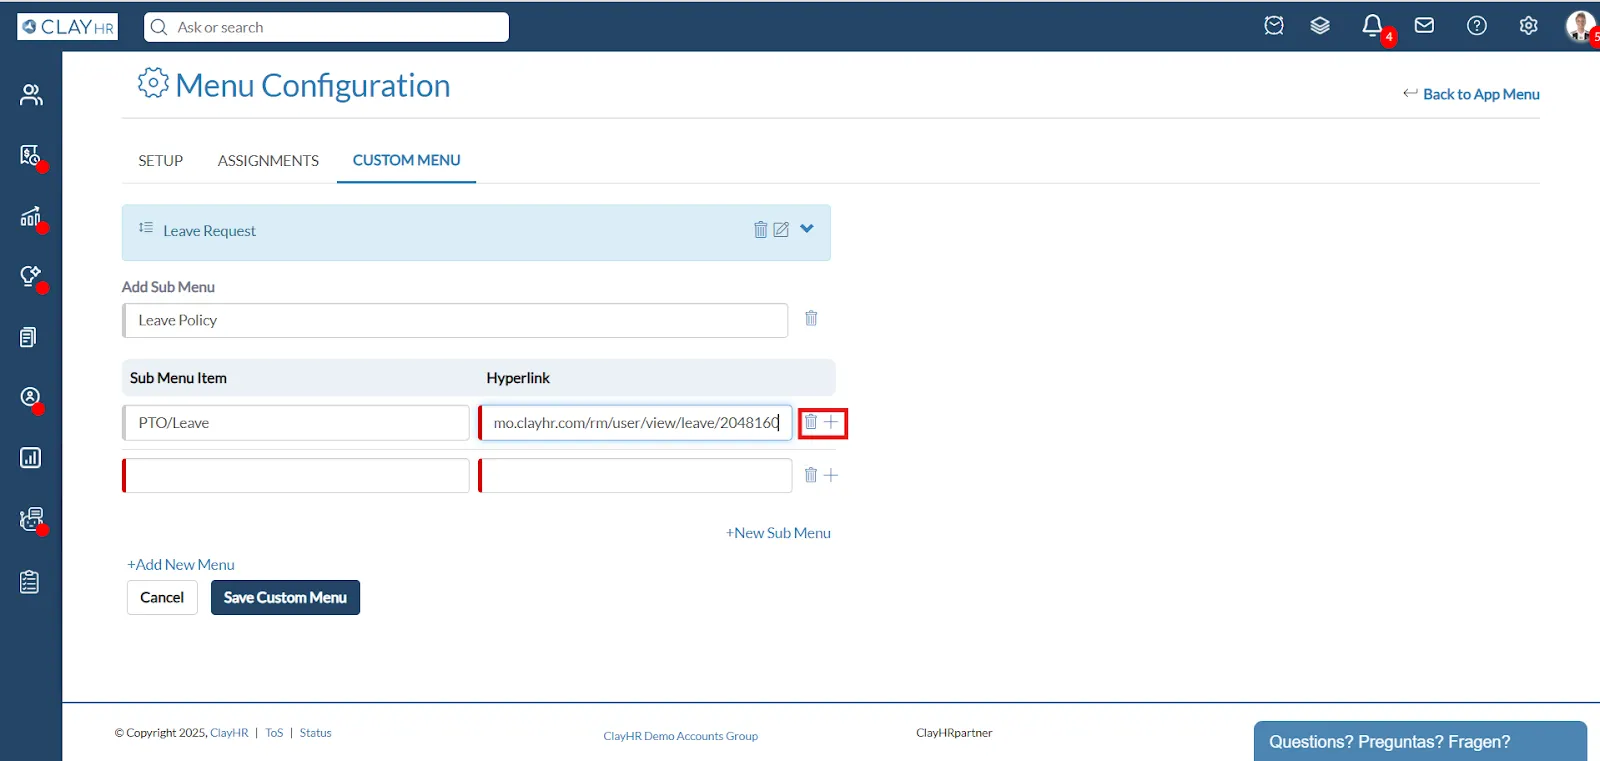
5. Esta sección le permite agregar y eliminar elementos del submenú junto con sus respectivos hipervínculos.
- Para añadir un nuevo submenú, haga clic en '+ Nuevo submenú' opción
- Para eliminar un submenú, haz clic en el icono de la papelera situado junto a él.

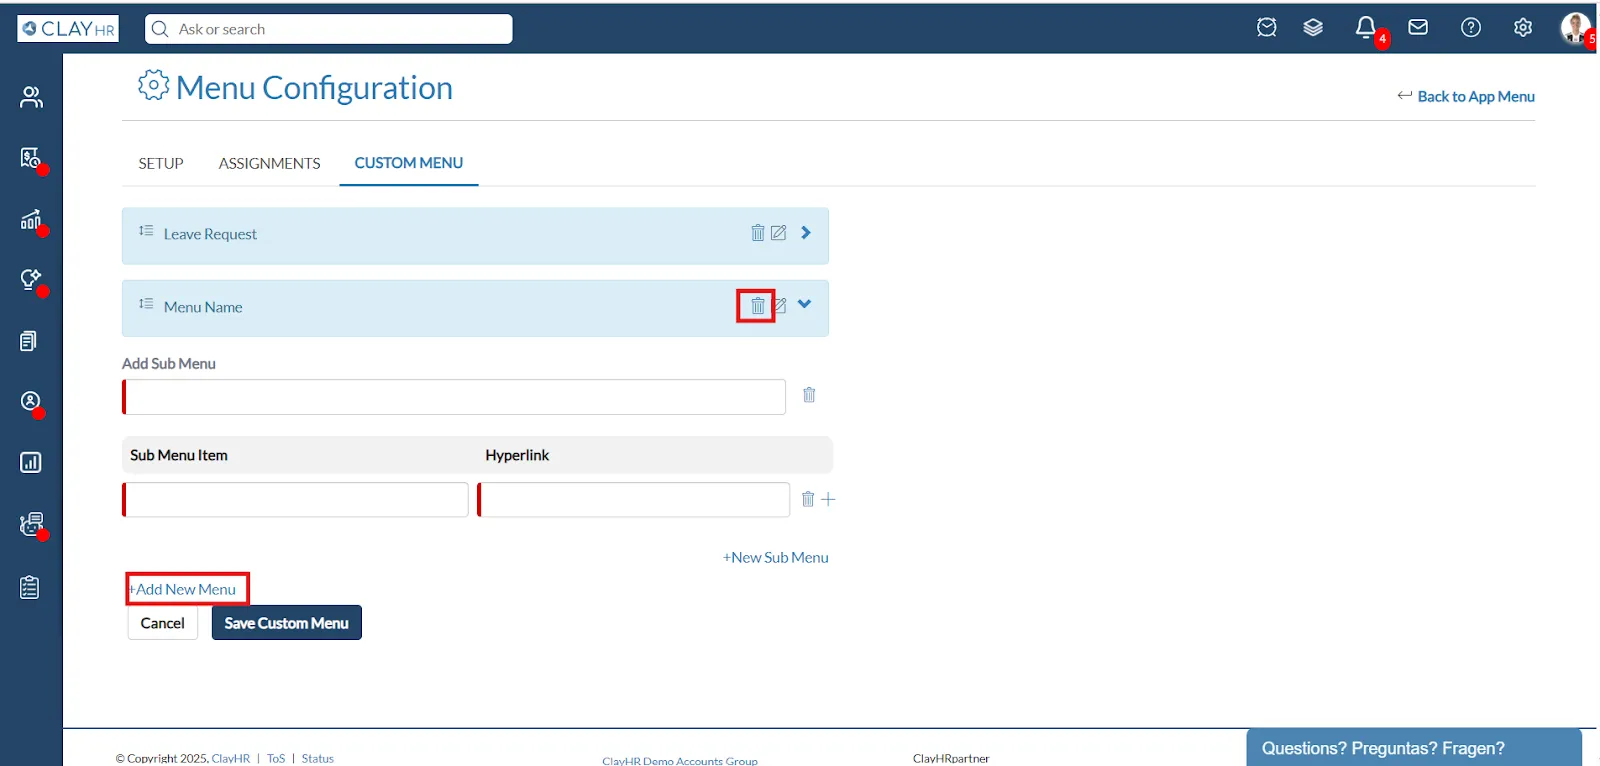
6. Esta sección le permite agregar y eliminar The Menu junto con sus respectivos submenús.
- Para añadir un nuevo submenú, haga clic en '+ Añadir nuevo menú' opción
- Para eliminar el menú, haz clic en el icono de la papelera situado junto a él.


.webp)
